

DIY Rustic valentine’s day banner

My oldest daughter, who is 4 years old, has really gotten into decorating for all the holidays. I didn’t have a whole lot of Valentine’s Day decorations, so I decided to make a banner with things I already had around the house. This was an easy project that my daughter really enjoyed. We ended up with 3 banners. One I made, one my 4 year old daughter made, and one my 2 1/2 year old daughter made (she couldn’t be left out).
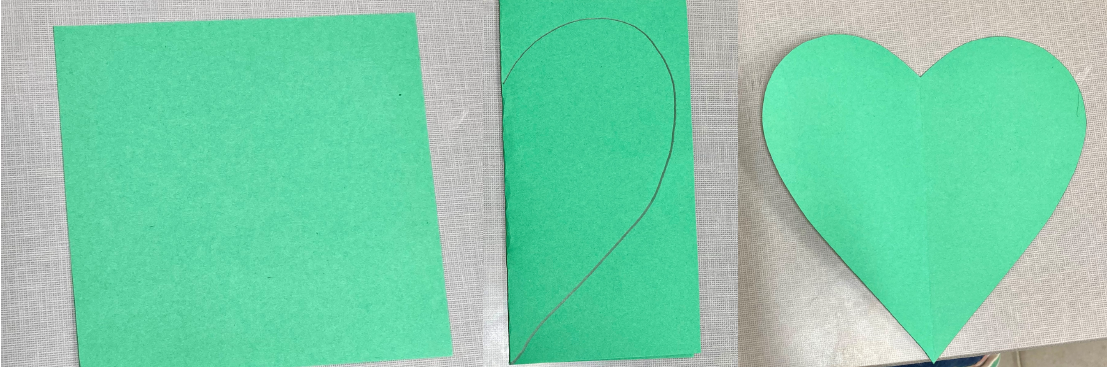
The first thing I did to make my banner was make the hearts. To do this I took an extra piece of construction paper I found and cut a 7” x 7” square. I just eyeballed the size I thought I might want; you can make it any size you want. I then folded the square in half and drew half a heart on one side of the paper. This will give you a perfectly symmetrical heart once you cut it out. I used this heart as my template.
I had some extra scrapbooking paper that I got from Walmart a long time ago. I love this paper because it has different patterns on each side of the paper. If I get tired of one side of the banner, I can flip it around and use the other side. I picked out nine different patterns that I liked. Then, I traced my heart template onto the paper. After that, I cut out the hearts and punched two holes at the top of each heart. I then used jute cord to string all the hearts on. I did not tie the hearts on to the jute cord because I wanted to be able to move them around. They stay in one spot really well without tying them. If you use a different type of string you might need to tie them so they don’t slip.
To make things easier for my 4 year old daughter I cut out a 7” x 7” square from each of the patterned paper she chose. Then I folded each square in half and drew half a heart on them (just like my template heart). She was then able to easily cut out the hearts. I then punched the first two holes in one of her hearts, to show her how to use the hole punch. I used that heart as a template to draw circles on the other hearts so she would know where to punch her holes. I then cut a piece of jute cord for her, and she was able to string all of her hearts on it.
I had to help my 2 1/2 year old daughter out quite a bit with this project. I made her squares a little smaller ( I just eyeballed them). Then, I did everything I did for my 4 year old daughter. I also helped her cut out the hearts and held the paper while she hole punched them. And, I had to help her string them on to the jute cord. I think they turned out so cute!
*Note: Before we hung them on the mantle, we hung them on a blank wall to use as a photo backdrop. I added a cute wooden stool for the girls to sit on.

